Step 6: Turn on Website protection and test it
Website protection reads each web request, so it can stop attacks that look like normal traffic at the connection level, such as requests for a site's private files. In this step you turn on Website protection for your test domain, let the sentry inspect HTTPS, watch what Website protection would have blocked in log mode, and then switch the domain to blocking.
The trial includes 1 Website protection licence. Each licensed sentry includes 1, and you can buy more on Billing.
You'll need:
- the origin agent showing Connected on your origin (step 3);
- a valid, publicly trusted HTTPS certificate for the domain on the origin, such as AutoSSL or Let's Encrypt. Self-signed certificates can't be used;
- to be an account owner, to approve the sentry's key and switch to blocking.
How log mode keeps you safe
A domain always starts Website protection in log mode. In log mode, these rules only record what they would block and let the requests through:
- requests for private files, such as
.env,.git,.sqland.bakfiles (Request for a private file); - requests that try to climb out of the site's folder with
../(Folder escape attempt); - the WAF, once you turn it on for the cluster.
These still block in log mode: the WordPress hardening rules on WordPress domains, rate limits (answered with HTTP 429), the WordPress admin login lock if you turn it on, and all Network protection.
On a WordPress domain, the login page and admin area stay open to everyone when you turn on Website protection. Locking them to your own IP addresses is optional; see step 8.
So you can see what Website protection would do to real traffic before it blocks anything. There's no time limit: the domain stays in log mode until an account owner switches it. See Website protection log mode.
1. Approve your sentry's HTTPS key
Each sentry has its own HTTPS key for receiving your certificates. Until you approve it, that sentry passes HTTPS through unopened.
- Open Clusters, expand your cluster and click the sentry's name.
- Find the HTTPS key card. It shows Waiting for approval and the Key fingerprint.
- Check that this is your sentry, then click Approve key.
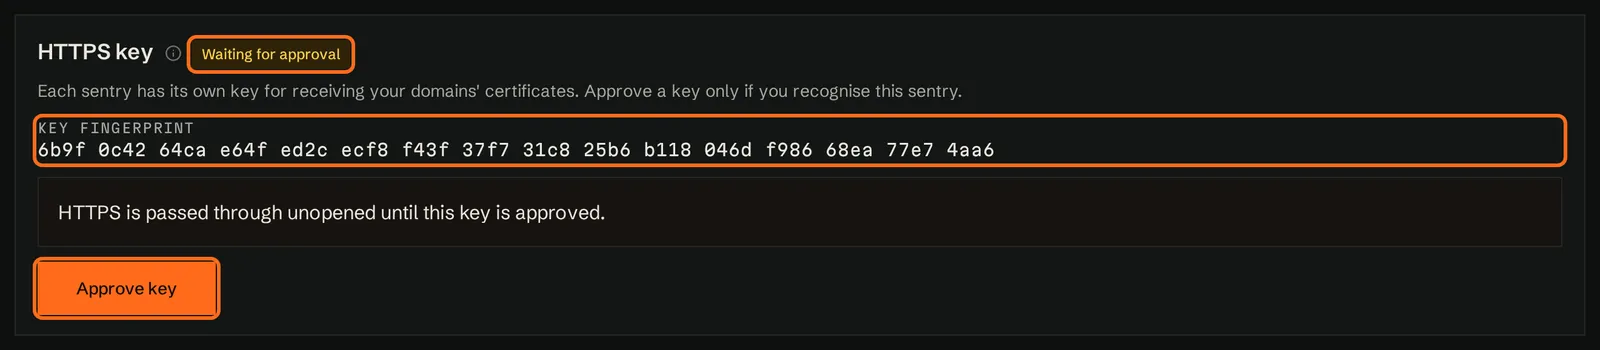
You should now see Approved, and Key approved. Your origin agents will send this sentry its certificates within a few minutes. The dashboard also alerts you whenever a sentry's HTTPS key is waiting.
If the card says This sentry hasn't sent a key yet. Update it to the latest version., click Force on the sentry's page to update it, then wait a few minutes. See Approving sentry HTTPS keys.
2. Turn on Website protection for the domain
- Open Domains.
- On your test domain's row, click Off in the Website protection column.
You should now see the button change to On, and a Log mode icon next to it. The Key under the table explains each icon. Your sentries pick up the change within about a minute.

If Off is greyed out, every Website protection licence is in use. Hover it for the reason. See Licences.
3. Wait for HTTPS to be inspected
The origin agent now sends the domain's certificate to your sentry. This usually takes a few minutes.
- Click the domain's name to open its page, then open the Protection tab. You can also click Edit domain and go to HTTPS.
- Look for the HTTPS badge.
You should now see HTTPS inspected, with a line saying how many of your sentries have the certificate, for example "2 of 3 sentries have this domain's certificate."
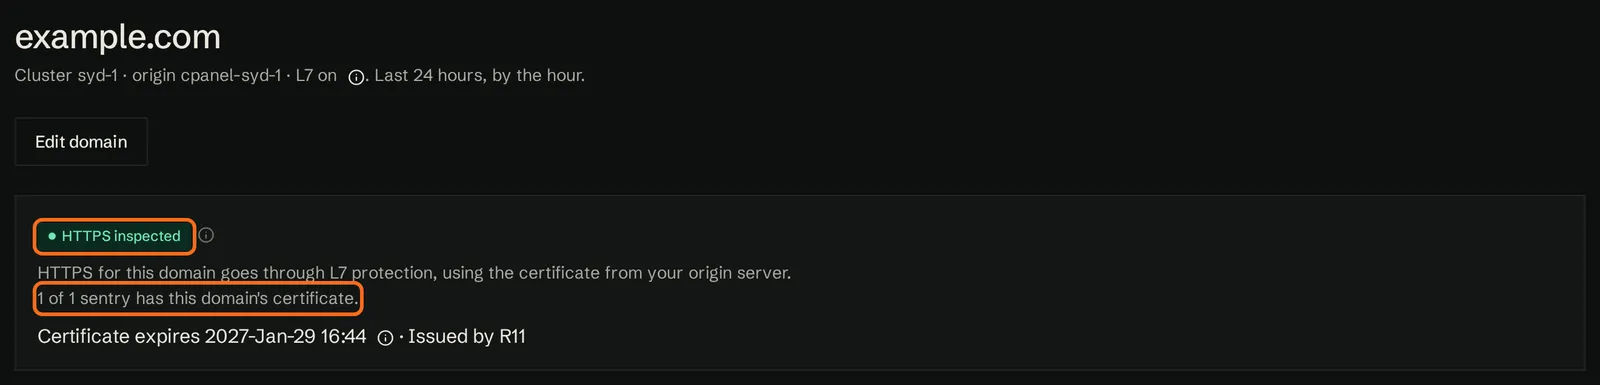
Until then, you'll see HTTPS passed through, with a line that says why, for example Waiting for the origin agent to send this domain's certificate. Website protection still applies to plain HTTP in the meantime. If a problem message appears, see Problem messages.
Once HTTPS is inspected, your HTTPS visitors count under Allowed/hr and Blocked/hr on Domains, and Passthrough HTTPS / hr drops to about zero. That's expected.
4. Turn on the WAF for the cluster (optional)
The WAF checks requests for common attacks, such as SQL injection and cross-site scripting, using the OWASP Core Rule Set. It's off until you turn it on for a cluster. Each cluster row on Clusters shows whether its WAF is on or off, so you can check at a glance.
- Open Clusters and click Edit on your cluster.
- Under Settings, tick Use the WAF (OWASP Core Rule Set) on domains with Website protection.
- Click Save.
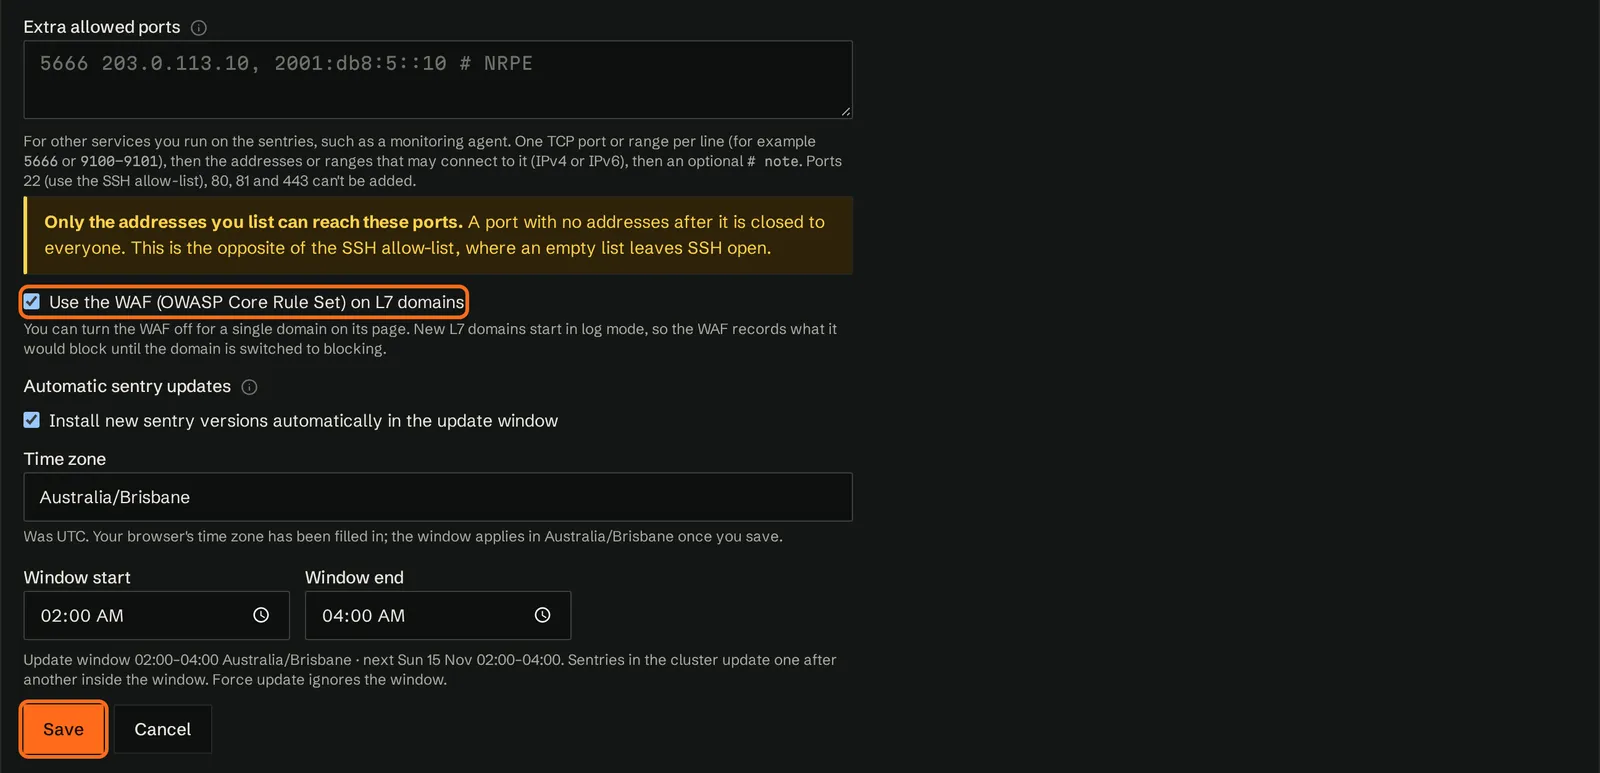
You should now see, on the domain's Protection tab, WAF showing On. Because the domain is in log mode, the WAF only records what it would block. Changes reach every sentry within about a minute. See WAF rules.
5. Send safe test requests
These requests look like attacks, but they're harmless: they only ask for files that shouldn't exist on your site. Run them from your own computer. If DNS doesn't point at the sentry yet, add --resolve example.com:80:203.0.113.10 (and --resolve example.com:443:203.0.113.10 for HTTPS) to each command, using your sentry's address.
# Request for a private file
curl -I http://example.com/.env

# Folder escape attempt
curl -I --path-as-is "http://example.com/../../etc/passwd"

# A request that looks like SQL injection (only checked when the WAF is on)
curl -I "http://example.com/?id=1%27%20OR%20%271%27%3D%271"
Once HTTPS is inspected, run the same requests with https:// too.
You should see, in log mode, your site's normal answer (often 404 Not Found, or a redirect), because log mode lets the requests through.
6. Read what log mode would have blocked
- Open the domain's page and go to the Blocks tab.
- Find Would have blocked, last 24 hours.
You should now see a count, a breakdown by rule, and your test requests under Recent requests recorded but let through, with the time, IP address, rule and path. The private file test shows as Request for a private file, the ../ test as Folder escape attempt, and, with the WAF on, the SQL injection test as a WAF rule, such as Database attack (rule 942100).
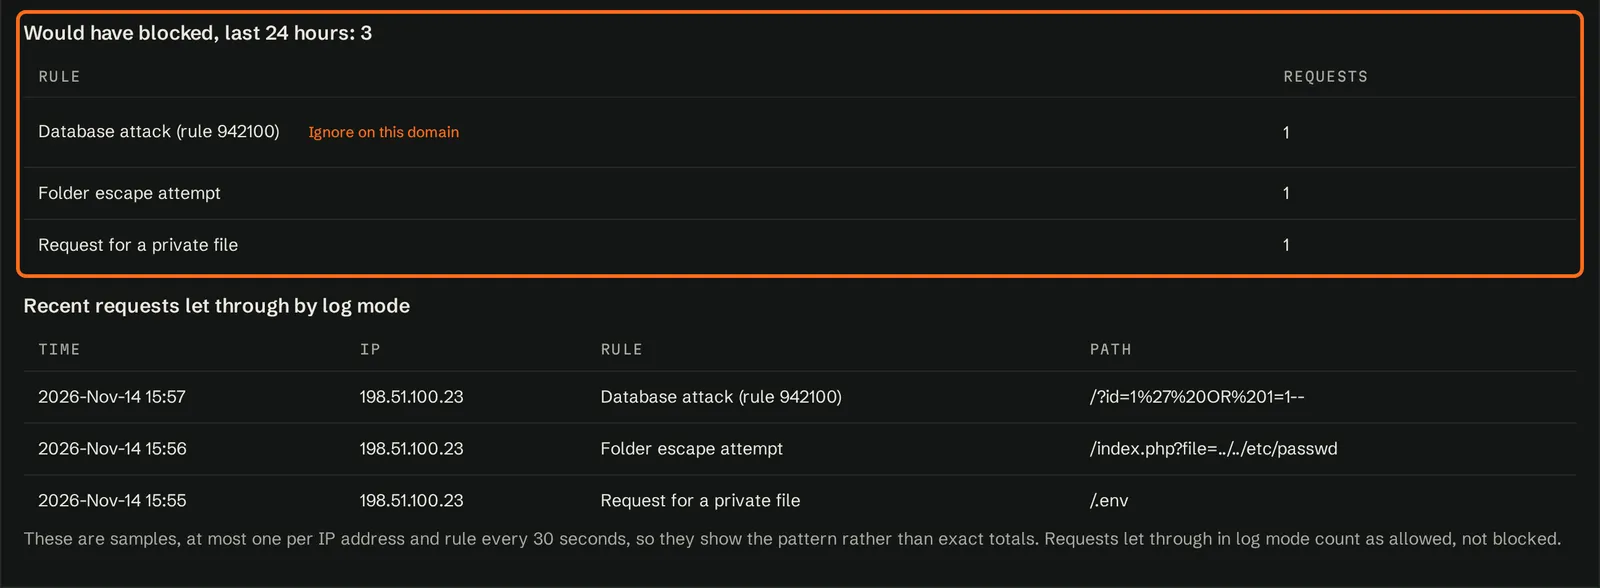
These are samples, at most one per IP address and rule every 30 seconds, so repeat a test after 30 seconds if you want to see it again. Requests recorded but let through count as allowed, not blocked, and don't appear under Logs.
Leave the domain in log mode for a while, ideally a few days with real traffic, and check this panel. Look for real visitors, not just your tests:
- If a WAF rule would block real visitors, click Edit domain, go to Website protection rules, and click Ignore on this domain next to it.
- If a private file rule would block a URL your site really uses, rename the file. Never keep these files in the web root.
7. Switch to blocking
- On the domain's page, click Edit domain, then Website protection rules under Settings on this page. It shows Log mode.
- Click Switch to blocking.
- Read the confirmation, Switch to blocking?, and click Switch to blocking in it.
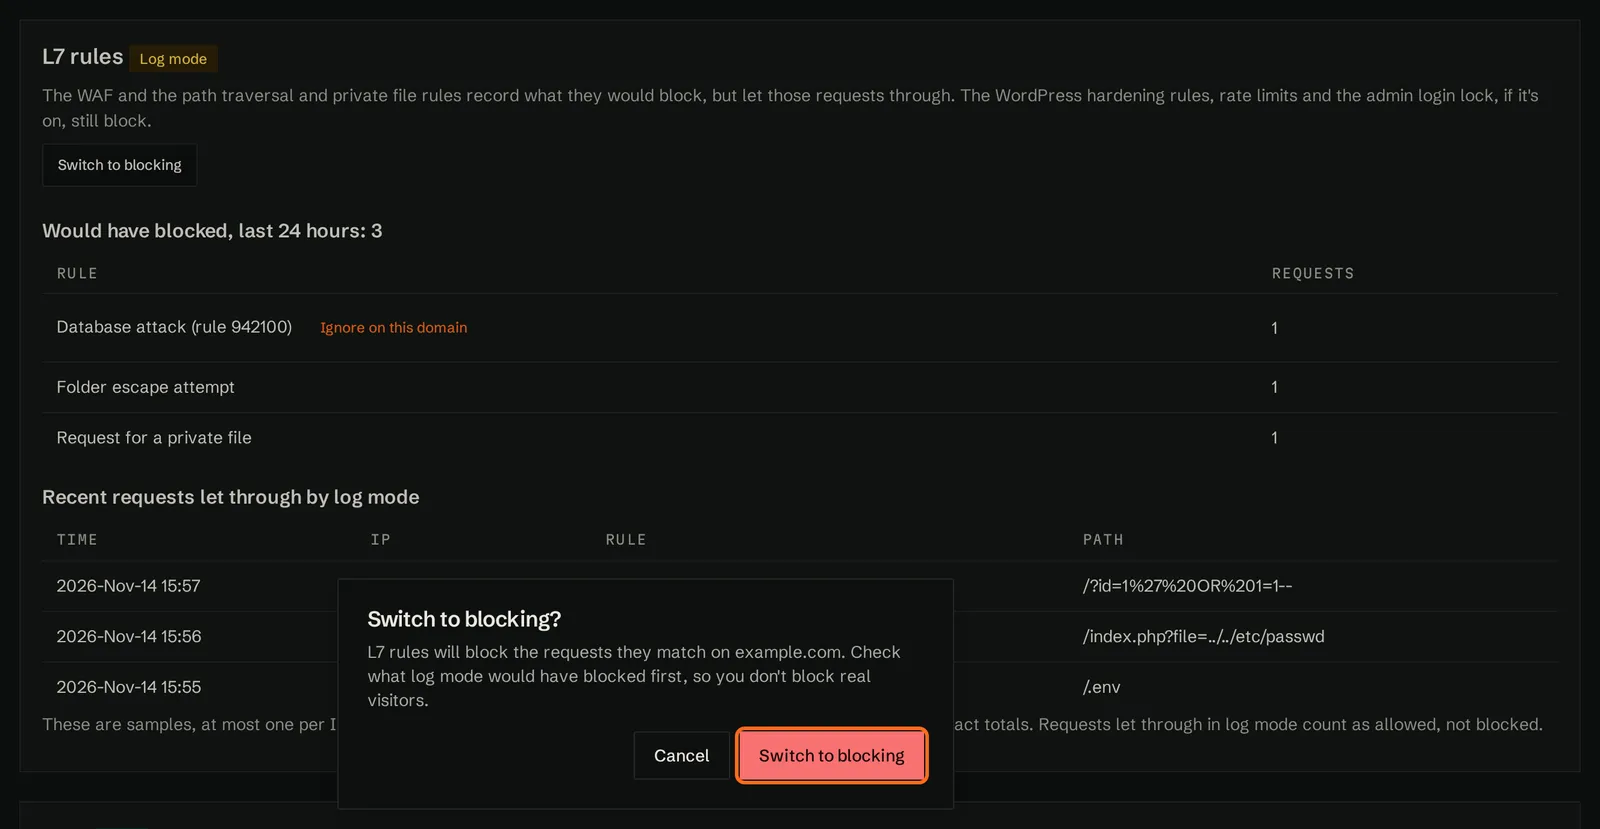
You should now see Blocking, with Website protection rules block the requests they match. On Domains, the Log mode icon is gone. The domain header no longer shows the Log mode badge.
Run the test requests from step 5 again. You should now see 403 Forbidden for each one. They count under Blocked/hr on Domains, show under Top block reasons on the domain's Blocks tab, and appear on Logs › Blocked IPs with their reason. Then browse the site normally to check real pages still load.
If something real breaks, click Switch to log mode on the same Website protection rules section. It takes effect within about a minute.
8. WordPress sites: lock the login page (optional)
Skip this step if the domain isn't a WordPress site, or if you don't want to limit who can reach its login page.
The Admin login lock lets only the IP addresses you list open wp-login.php and /wp-admin/. Everyone else gets a 403 Forbidden, in log mode too. /wp-admin/admin-ajax.php stays open, because the site's public pages use it.
- Find your own IP address: open Check an IP on the computer you log in to WordPress from.
- On the domain's page, click Edit domain, then WordPress rules under Settings on this page. Find Admin login lock.
- In Allowed IP addresses, enter your own address first, then every address your customer logs in from, one per line. Ranges such as
203.0.113.0/24work too, up to 50 entries. - Click Turn on lock, read the reminder and confirm.
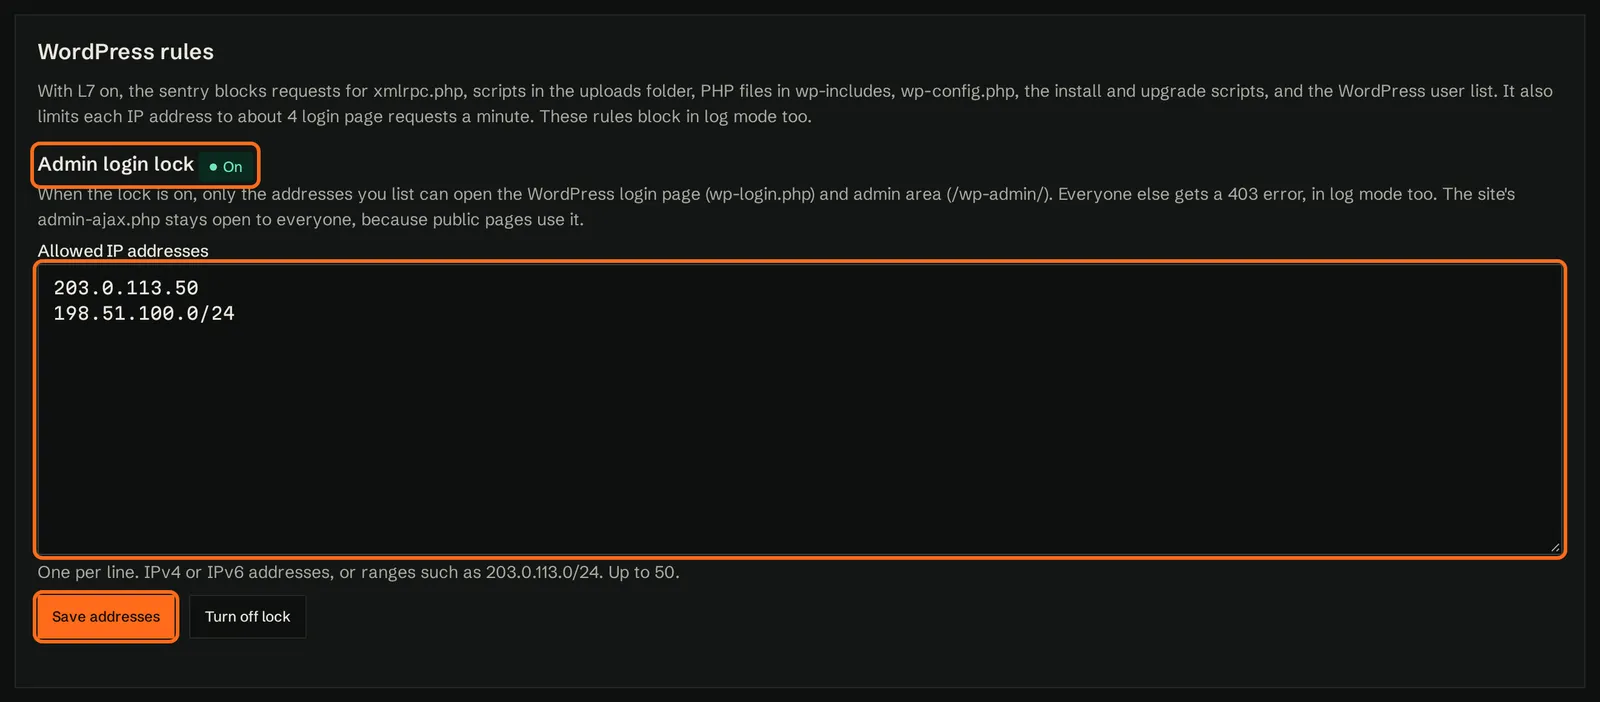
You should now see On next to Admin login lock, and Admin login lock saved.
To test it, wait a minute, then open https://example.com/wp-login.php from your computer: the login page loads. From an address that isn't on the list, for example a phone on mobile data with Wi-Fi off, you get 403 Forbidden, and Logs › Blocked IPs shows the reason wp-admin-lock.
If you or your customer are locked out, add the address and click Save addresses, or click Turn off lock. See Admin login lock.
9. Check real visitor addresses over HTTPS
With HTTPS inspected, every request reaches the origin with X-Forwarded-For, over HTTPS too. Visit https://example.com/ and check the origin's access log, or $_SERVER["REMOTE_ADDR"] in PHP. It should show your address. If it doesn't, check step 3.
Common problems
| Problem | What to do |
|---|---|
| Off in the Website protection column is greyed out | Every Website protection licence is in use. Turn Website protection off on another domain, or add capacity on Billing. |
| No origin agent is installed on this domain's origin server. | Install the origin agent on that origin. |
| No sentry is ready to receive this domain's certificate yet. | Approve the sentry's HTTPS key, and update any sentry that can't inspect HTTPS yet. |
| The certificate on the origin server is self-signed. | Replace it with a certificate from a public certificate authority, for example Let's Encrypt. |
| Another certificate message | See Problem messages. |
| WAF on the Protection tab, or on Edit domain, says The WAF is off in this domain's cluster settings, so it isn't checking requests to this domain. | Tick Use the WAF (OWASP Core Rule Set) on domains with Website protection from the cluster's Edit page (step 4). |
Real visitors get 429 | They went over the cluster's Website protection requests per second per IP and Website protection burst. Rate limits block in log mode too. Raise the limits on the cluster's Edit page if they're too low for your site. See http-429. |
Someone can't reach the WordPress login or dashboard (403, reason wp-admin-lock) | The domain's admin login lock is on and their address isn't on the list. Add it under WordPress rules › Admin login lock on Edit domain and click Save addresses, or turn the lock off. |
Nobody can reach the WordPress login or dashboard (403, reason wp-login-acl or wp-admin-acl) | A sentry is still on an older version. Click Force on its row on the cluster's Edit page to update it. |
A WordPress feature stops working, such as xmlrpc.php | The WordPress hardening rules block from the start. See WordPress protection. |
| Only an account owner can change this. | Ask an account owner to switch the domain. |
Every block reason is explained in Log reasons explained.