Step 3: Configure your origin server
Your origin is the web server that hosts your sites. In this step you add it in the portal, install the origin agent on it, make sure the origin accepts traffic from your sentries, and set it up to see your visitors' real IP addresses.
Once your sites are behind the sentry, all web traffic reaches the origin from your sentries' IP addresses. That's why the origin's firewall and security tools must trust those addresses, and why the web server needs to be told where to find the real visitor address.
You'll need: root access to the origin server, its public IP address, and your sentry's public IP address (from the sentry's page, see Step 2).
1. Add the origin in the portal
- Open Origins and click Add origin server. (Or click Add an origin on the Getting started card.)
- Fill in:
- Name: a label you'll recognise, for example
cpanel-syd-1. - Upstream IP or host: the origin's public IP address, for example
203.0.113.20. - HTTP port: where the sentry sends plain HTTP, and all traffic for domains with Website protection. Usually
80. - HTTPS port: where the sentry sends HTTPS it passes through. Usually
443. - Cluster: the cluster you made in step 2.
- Name: a label you'll recognise, for example
- Click Add origin server.
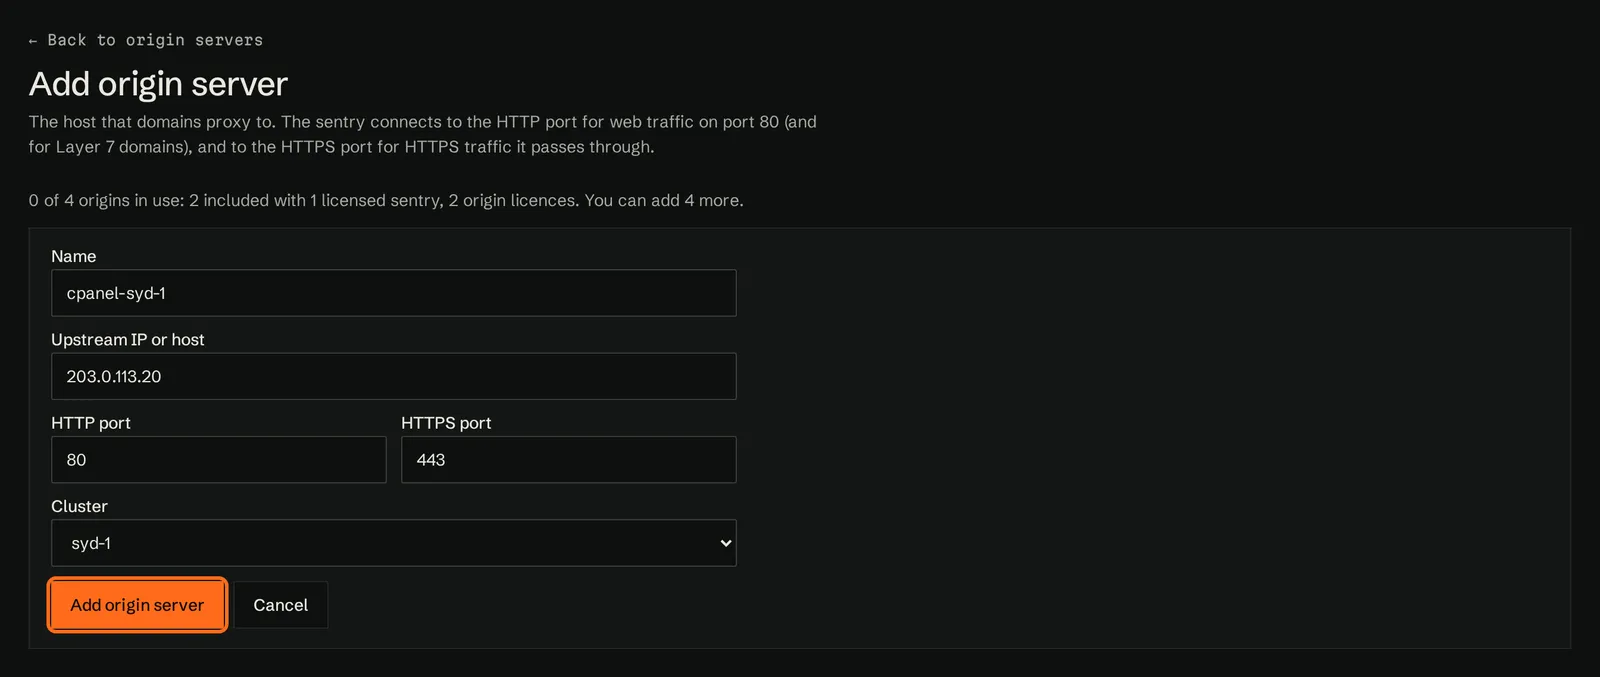
You should now see Origin server added and your origin in the list. The trial includes 2 origins. See Origins.
The origin's type starts as Generic. The origin agent sets it for you in the next step.
2. Install the origin agent
The origin agent is a small program that runs on the origin server. Network protection works without it, but install it now, because it:
- finds the domains on the origin server, so you can add them in a few clicks in step 4;
- sends each Website protection domain's existing HTTPS certificate to your sentries, sealed so only they can read it, so Website protection can inspect HTTPS in step 6;
- detects cPanel, Plesk and DirectAdmin and sets the origin's type.
The origin server needs outbound HTTPS (TCP 443) to control.stillorigin.app. The agent runs on 64-bit (x86_64) Linux with systemd.
- cPanel
- Plesk
- DirectAdmin
- Enhance
- Other Linux server
- On Origins, click Edit on your origin.
- Under Origin agent, click Get install command.
- Click Copy.
- Connect to the cPanel server over SSH as root, paste the command and press Enter. Run it within one hour: the command works once.
On a cPanel server, the installer also installs the stillorigin cPanel plugin. You still need to turn Manage protection on for your plans in WHM's Feature Manager; it isn't turned on for existing plans automatically.
- On Origins, click Edit on your origin.
- Under Origin agent, click Get install command.
- Click Copy.
- Connect to the Plesk server over SSH as root, paste the command and press Enter. Run it within one hour: the command works once.
- On Origins, click Edit on your origin.
- Under Origin agent, click Get install command.
- Click Copy.
- Connect to the DirectAdmin server over SSH as root, paste the command and press Enter. Run it within one hour: the command works once.
The agent never detects Enhance on its own, and it reads certificates through your Enhance panel's API. You run it once for the whole Enhance install.
- On Origins, click Edit on one of your Enhance origins.
- Tick This origin server uses Enhance before you copy the command.
- If you've added other Enhance origin servers, tick them under Also use this agent for these Enhance origin servers.
- Click Get install command, then Copy.
- In the command, replace:
ENHANCE_API_TOKENwith an Enhance access token with the Super Admin role (Settings › Access tokens in Enhance);PANEL_HOSTwith your panel's hostname (not a full URL);ORG_IDwith your organisation ID.
- Run it as root, within one hour, on a server that can reach your Enhance panel.
Restrict the access token to the agent server's IP address if you can, and give it an expiry you will renew. See Enhance.
- On Origins, click Edit on your origin.
- Under Origin agent, click Get install command.
- Click Copy.
- Connect to the server over SSH as root, paste the command and press Enter. Run it within one hour: the command works once.
The agent reads certificates from the usual places, including Let's Encrypt.
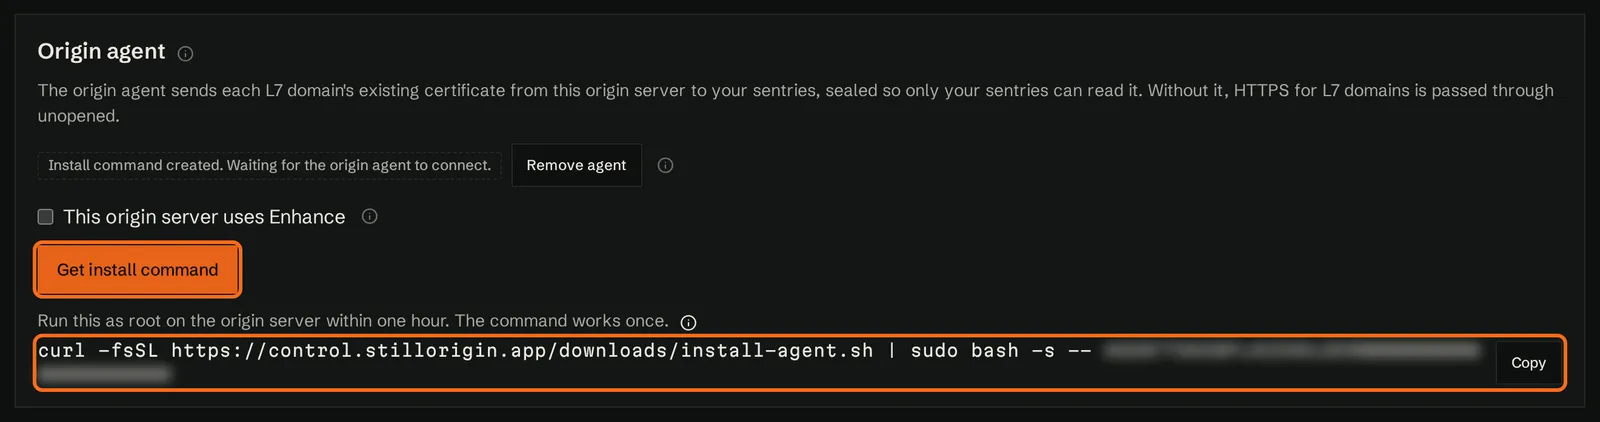
The command looks like this (the portal fills in the one-time token):
curl -fsSL https://control.stillorigin.app/downloads/install-agent.sh | sudo bash -s -- YOUR_TOKEN
When it's done it prints stillorigin agent installed and running.
You should now see, on the origin's page, the agent's status change from Install command created. Waiting for the origin agent to connect. to Connected, with its type (for example cPanel), version and Last seen time. On Origins, the origin shows Connected too.

Only an account owner can create the install command. See Installing the origin agent.
Keeping the origin agent up to date
The origin agent updates itself. You don't need to install new versions by hand.
It checks for a new release about every 6 hours (each server at a slightly different time), and again 10 minutes after the agent starts. It only installs a release signed by stillorigin, and it checks the download before swapping it in. If a new version fails to start, it goes back to the previous version by itself and never retries that version.
On cPanel servers, the Manage protection plugin is updated along with the agent.
The origin's page in the portal shows the agent's version and Last seen.
To check for an update now, restart the agent. It checks within 10 minutes:
sudo systemctl restart stillorigin-agent
To see what happened:
sudo journalctl -u stillorigin-agent
A successful update logs updated to <version>, then update to <version> confirmed. If a release is refused, the log has a line starting SECURITY: refusing agent update.
To turn automatic updates off on one server, add "autoUpdate": false to /etc/stillorigin-agent/agent.json and restart the agent. That server then won't get fixes until you turn automatic updates back on.
3. Let your sentries through the origin's firewall
From now on, your origin gets its web traffic from your sentries' IP addresses. If the origin's firewall or a security tool blocks a sentry, every site behind it goes offline. So:
- make sure the origin accepts connections on its HTTP and HTTPS ports (usually 80 and 443) from every sentry's public IP address;
- if a tool on the origin blocks addresses automatically (for example after too many requests or failed logins), add every sentry's address to that tool's allow list, so it never blocks a sentry.
- cPanel
- Plesk
- DirectAdmin
- Enhance
- Other Linux server
If the server uses CSF (ConfigServer Security & Firewall), allow each sentry as root:
csf -a 203.0.113.10 "stillorigin sentry fw1"
If you use another firewall or security tool, such as Imunify360, add each sentry's address to its allow list (often called a whitelist).
- In Plesk, go to Tools & Settings › IP Address Banning (Fail2Ban) › Trusted IP Addresses.
- Click Add Trusted IP, enter a sentry's public IP address, and click OK.
- Repeat for each sentry.
If you use the Plesk firewall or another firewall, make sure it allows ports 80 and 443 from your sentries.
If the server uses CSF (ConfigServer Security & Firewall), allow each sentry as root:
csf -a 203.0.113.10 "stillorigin sentry fw1"
If you use another firewall or security tool, add each sentry's address to its allow list.
Make sure every Enhance server that hosts websites accepts ports 80 and 443 from your sentries, in any firewall you run on the servers or at your provider. If you use a security tool that blocks addresses automatically, add each sentry's address to its allow list.
Make sure the server's firewall allows ports 80 and 443 from your sentries. For example, with firewalld:
firewall-cmd --permanent --add-rich-rule='rule family="ipv4" source address="203.0.113.10" port port="80" protocol="tcp" accept'
firewall-cmd --permanent --add-rich-rule='rule family="ipv4" source address="203.0.113.10" port port="443" protocol="tcp" accept'
firewall-cmd --reload
If you use Fail2Ban, add each sentry's address to ignoreip in /etc/fail2ban/jail.local, then restart Fail2Ban.
Replace 203.0.113.10 with your sentry's public IP address, and repeat for each sentry. If your sentries have IPv6 addresses, allow those too.
Once your DNS points at the sentries and everything works, you can restrict the origin's web ports so they only accept your sentries. Then nobody can go around the sentry by connecting to the origin directly. Do this last, after step 5.
4. Show real visitor IP addresses on the origin
Because traffic now comes from the sentry, your origin sees the sentry's address for every visitor unless you change that. Logs, .htaccess rules and PHP would all show the sentry's address.
For plain HTTP (port 80), and for every request on a domain with Website protection, the sentry sends the visitor's address in the X-Forwarded-For and X-Real-IP headers. Tell your web server to trust your sentries and read that header. Use the public IP addresses (IPv4, and IPv6 if they have one) of every sentry in the cluster, and trust only those addresses.
- cPanel
- Plesk
- DirectAdmin
- Enhance
- Other Linux server
With Apache
-
Check that
mod_remoteipis loaded:httpd -M | grep remoteip. -
In WHM, go to Apache Configuration › Include Editor › Pre VirtualHost Include, choose All Versions, and add (or put the same lines in
/etc/apache2/conf.d/includes/pre_virtualhost_global.conf):RemoteIPHeader X-Forwarded-ForRemoteIPTrustedProxy 203.0.113.10 203.0.113.11 -
Save the include, then restart Apache.
If an existing Cloudflare include on the server overrides your mod_remoteip settings, cPanel's own fix is touch /var/cpanel/no_apache_cloudflare, then rebuild and restart Apache.
With LiteSpeed Enterprise
In the LiteSpeed WebAdmin console, set Use Client IP in Header to Trusted IP Only (or Yes), add your sentry addresses to the trusted IP list, save and do a graceful restart.
For each domain, in Plesk go to Apache & nginx Settings › Additional nginx directives and add:
set_real_ip_from 203.0.113.10;
set_real_ip_from 203.0.113.11;
real_ip_header X-Forwarded-For;
real_ip_recursive on;
Click OK or Apply.
This covers DirectAdmin servers where Apache answers web traffic itself.
-
Check that
mod_remoteipis loaded:httpd -M | grep remoteip. -
Add these lines to
/etc/httpd/conf/extra/httpd-includes.conf:RemoteIPHeader X-Forwarded-ForRemoteIPTrustedProxy 203.0.113.10 203.0.113.11 -
Restart Apache:
systemctl restart httpd.
If nginx is in front of Apache (nginx_apache), set it up in nginx instead, as shown under Other Linux server, in a way that survives DirectAdmin's configuration rebuilds.
Enhance doesn't document a setting for this that we can point you to. For the visitor's address on HTTPS, turn on Website protection for the domain in step 6: domains with Website protection always send X-Forwarded-For. For port 80, ask Enhance support how to trust X-Forwarded-For from your sentries' addresses.
nginx
set_real_ip_from 203.0.113.10;
set_real_ip_from 203.0.113.11;
real_ip_header X-Forwarded-For;
Apache (mod_remoteip)
RemoteIPHeader X-Forwarded-For
RemoteIPTrustedProxy 203.0.113.10 203.0.113.11
Reload or restart the web server afterwards.
Replace 203.0.113.10 and 203.0.113.11 with your own sentries' addresses. With one sentry, list just that one.
For a domain with Website protection off, HTTPS is passed through to the origin without being decrypted, so the sentry can't add a header. On those connections the origin sees the sentry's address. You have two ways to fix that:
- turn on Website protection for the domain (step 6). Once HTTPS is inspected, every request carries
X-Forwarded-For; or - turn on PROXY protocol for the domain. This is an advanced setting: set up the origin first, or the site stops loading over HTTPS.
The sentry's own logs and the portal always record the real visitor addresses.
You'll check that this works in step 5. See Trusting the sentry for more.
Common problems
| Problem | What to do |
|---|---|
| Add origin server is turned off | Every origin place is in use. Each licensed sentry includes 2 origins. Remove an origin you don't need, or add capacity on Billing. |
The agent install says an install token is required | The command was changed or is incomplete. Copy it again with Copy, or click Get install command for a new one. |
The agent install says the agent is built for x86_64 Linux only or systemd is required | The agent runs only on 64-bit Linux with systemd. |
| The agent stays Not connected | Check journalctl -u stillorigin-agent -n 50 on the origin, and that the server can reach control.stillorigin.app on TCP 443. The command works once and expires after an hour, so click Get install command again if needed. |
| The type shows Generic on a cPanel, Plesk or DirectAdmin server | Wait for the agent to report. The type can't be changed in the portal. On Enhance, tick This origin server uses Enhance before you copy the command. |
| Sites go offline after a while, with the stillorigin offline page | The origin is probably blocking a sentry. Allow every sentry's address in the origin's firewall and security tools (see above). |
| Logs on the origin still show the sentry's address | For port 80, check the trusted addresses and restart the web server. For HTTPS on a domain with Website protection off, see What about HTTPS? above. |