Step 2: Install your sentry
A sentry is the firewall server that sits in front of your web servers. In this step you create your API key, add a cluster and a sentry in the portal, run one install command on a new Linux server, and check that the sentry shows Online.
You'll need: a new server that meets the requirements, root access to it, and about 15 minutes.
Server requirements
Operating system
| Supported | |
|---|---|
| Distribution | AlmaLinux, Rocky Linux or Red Hat Enterprise Linux (RHEL) |
| Version | 9 or 10 |
| Architecture | x86_64 (64-bit Intel/AMD) only. ARM servers are not supported. |
| C library | glibc 2.34 or newer (all supported versions meet this) |
The installer checks the distribution and version and stops on anything else.
A freshly installed server
A sentry needs a freshly installed AlmaLinux, Rocky Linux or RHEL 9 or 10 server (or virtual machine) that does nothing else. The installer replaces the system's nginx, nftables and keepalived configuration and disables firewalld.
The installer checks the server first and refuses to run if it finds any of these, listing what it found:
- a web server or proxy, installed or running, such as Apache (httpd), nginx, LiteSpeed or OpenLiteSpeed, lighttpd, Caddy, HAProxy, Varnish or Tomcat;
- anything already using TCP port 80 or 443;
- a hosting control panel, such as cPanel, Plesk, DirectAdmin, CyberPanel, ISPConfig, Webmin or Enhance;
- an earlier stillorigin install.
It warns (and gives you 15 seconds to cancel) if a database server or mail server such as Dovecot is installed, or if /var/www/html is not empty. The mail server that ships with the operating system (Postfix) is fine.
There is no way to skip the check. To reinstall a sentry, reinstall the operating system first (or start from a new server), then run the install command. Updates are different: sentries update themselves, and Force update (the Force button on the sentry's page, or Force update all on Clusters) doesn't run the installer, so it isn't affected.
Never install a sentry on a server that hosts websites.
Size
We recommend a baseline of 2 vCPU, 2 GiB RAM and 20 GiB of disk per sentry. This is a starting point, not a guarantee: the resources a sentry needs grow with your traffic, the number of origins and the number of domains it protects. Be prepared to upgrade a sentry's resources (or add another sentry) as your sites grow or during heavy attacks.
A sentry's Load figure and Health view, on its page in the portal (open Clusters, then the sentry), show how hard it is working. If load stays high, add CPU and memory.
Access
You need root access (or sudo) and outbound internet access during installation.
Network and IP addresses
- A public IPv4 address for each sentry. Your domains point at these addresses (see Point DNS at your sentries).
- IPv4 and IPv6. Sentries accept IPv4 traffic, and IPv6 too when the server has an IPv6 address. Point AAAA records at the sentries' IPv6 addresses, or remove them: an AAAA record that points at the origin lets IPv6 visitors bypass the sentry.
- How many sentries. One sentry is enough to protect your sites. For resilience, run two or more sentries in the same cluster and list all of them in DNS (see Add more sentries).
Firewall and ports
Inbound to each sentry:
| Port | From | Why |
|---|---|---|
| TCP 80 and 443 | Anyone (your visitors) | Web traffic for your domains |
| TCP 22 (or your SSH port) | Your administrators only | SSH. Restrict it with the cluster's SSH allow-list, your provider's firewall, or both |
| Other services you run, such as NRPE on TCP 5666 | Only the addresses you choose | Add them as the cluster's extra allowed ports |
stillorigin never connects in to your sentries; the sentry always connects out.
Outbound from each sentry:
| Destination | Port | Why |
|---|---|---|
control.stillorigin.app | TCP 443 (HTTPS) | Settings, traffic reports and updates. Required at all times |
| Your origin servers | The HTTP port and HTTPS port set on each origin (usually 80 and 443) | Passing traffic to your sites |
Public DNS resolvers 1.1.1.1 and 8.8.8.8 | UDP/TCP 53 | Looking up origin host names |
| Time servers | UDP 123 | Accurate time (installed as chronyd) |
| Your OS and EPEL package mirrors | TCP 80 and 443 | Installing packages (during install) |
nginx.org | TCP 443 (HTTPS) | Installing and updating nginx |
If the server has its own firewall rules from your provider's image, make sure they allow the above. The installer disables firewalld; the sentry manages the server's packet filter (nftables) itself.
1. Create your API key
Your sentries use your account's API key, together with their own device key, to connect to stillorigin. You create it once for the whole account.
- On the dashboard, under Getting started, click Create your API key. (Or open My account from the menu at the bottom of the sidebar, then API key.)
- Click Create API key.
- Click Copy key and save the key in your password manager.
- Click Continue to add a sentry.
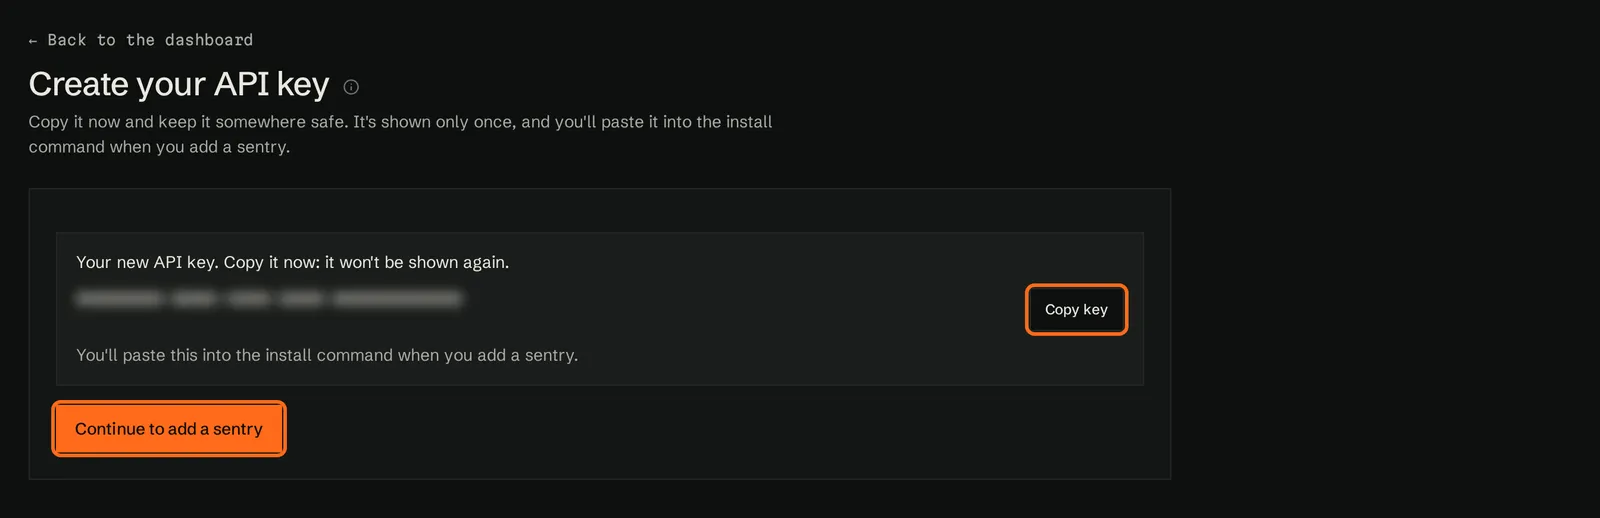
stillorigin doesn't keep a readable copy of the API key. If you lose it, an account owner can create a new one under My account › API key, and then every installed sentry needs the new key. See Your API key.
Only an account owner can create the API key. The person who signed up is an account owner.
2. Add a cluster
A cluster is a group of sentries that share settings, domains and a deny list. Your first sentry needs a cluster to go in.
- If you clicked Continue to add a sentry, you're already on Add cluster. Otherwise open Clusters and click Add cluster.
- Enter a Name, for example
syd-1. Use letters, numbers, dots, underscores or hyphens. - Leave VIP (optional) empty. It's only for a floating IP address that stillorigin support has helped you set up.
- Click Add cluster.
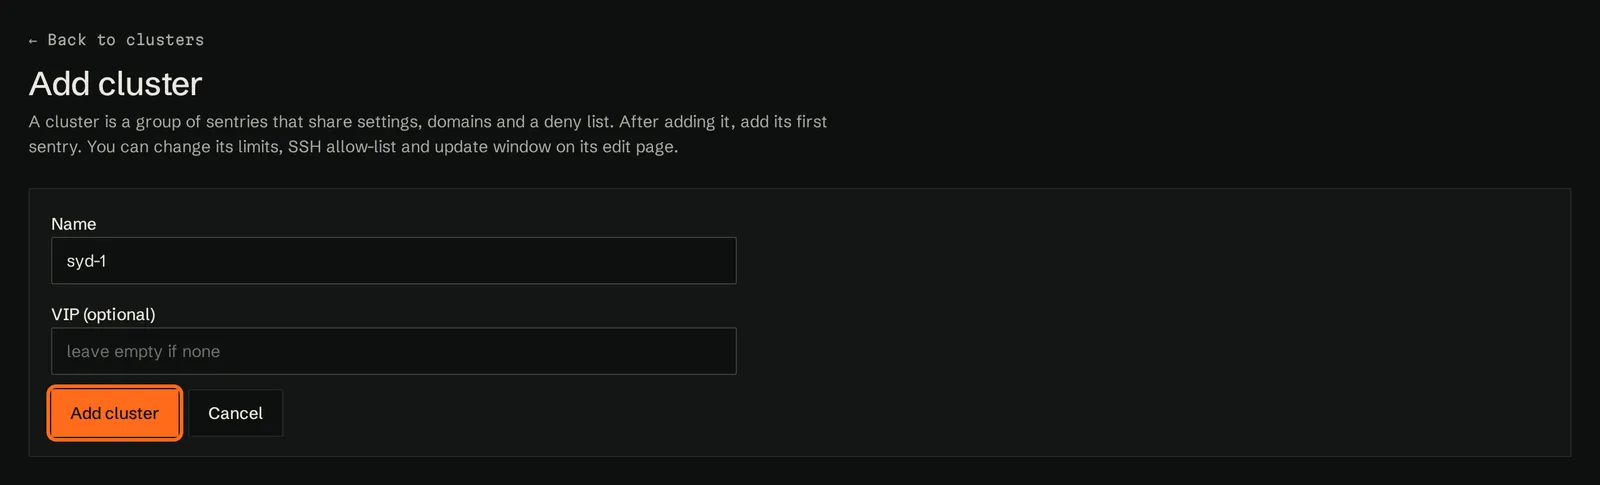
You should now see the cluster's page and Cluster added: Now add its first sentry.
3. Add the sentry in the portal
- On the cluster's page, click Add sentry. (From Clusters, you can also expand your cluster and click Add sentry.)
- Fill in:
- Sentry name: letters, numbers, dots, underscores or hyphens, up to 64 characters (for example
fw1). - Priority and Interface: leave the defaults (100 and
eth0) unless stillorigin support has asked you to change them. - Sentry licence: choose one of your available sentry licences. Your trial licence is chosen for you. If you have none, the portal says so and Add sentry is turned off. Buy another sentry licence, or free one up on Billing, under Licences.
- Sentry name: letters, numbers, dots, underscores or hyphens, up to 64 characters (for example
- Click Add sentry. This uses the licence you chose.
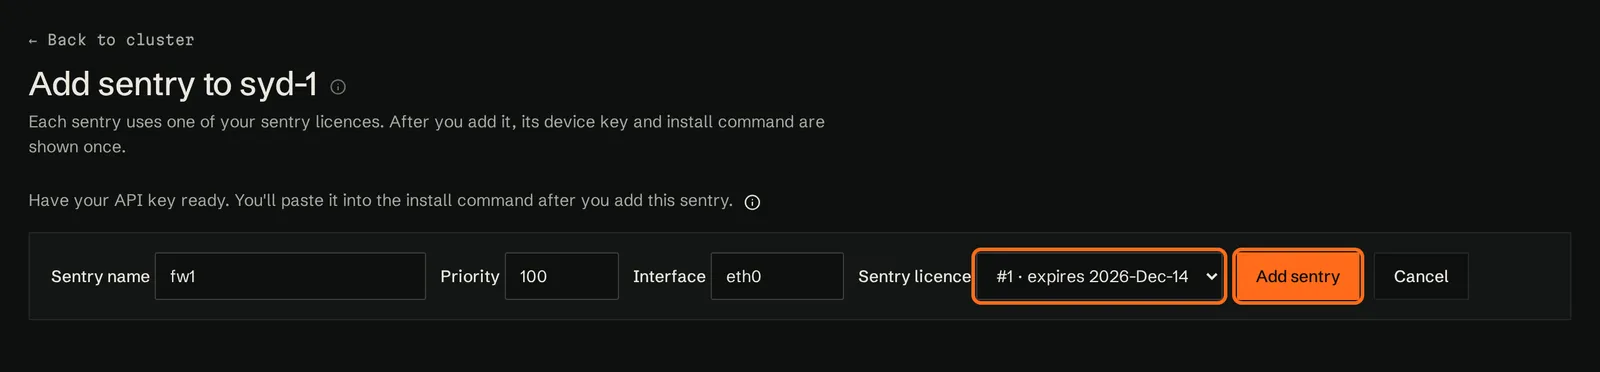
You can also add a sentry from Billing › Licences › Add a sentry.
You then land on the new sentry's page. At the bottom it shows the sentry's device key and install command, with Copy key and Copy install command buttons.
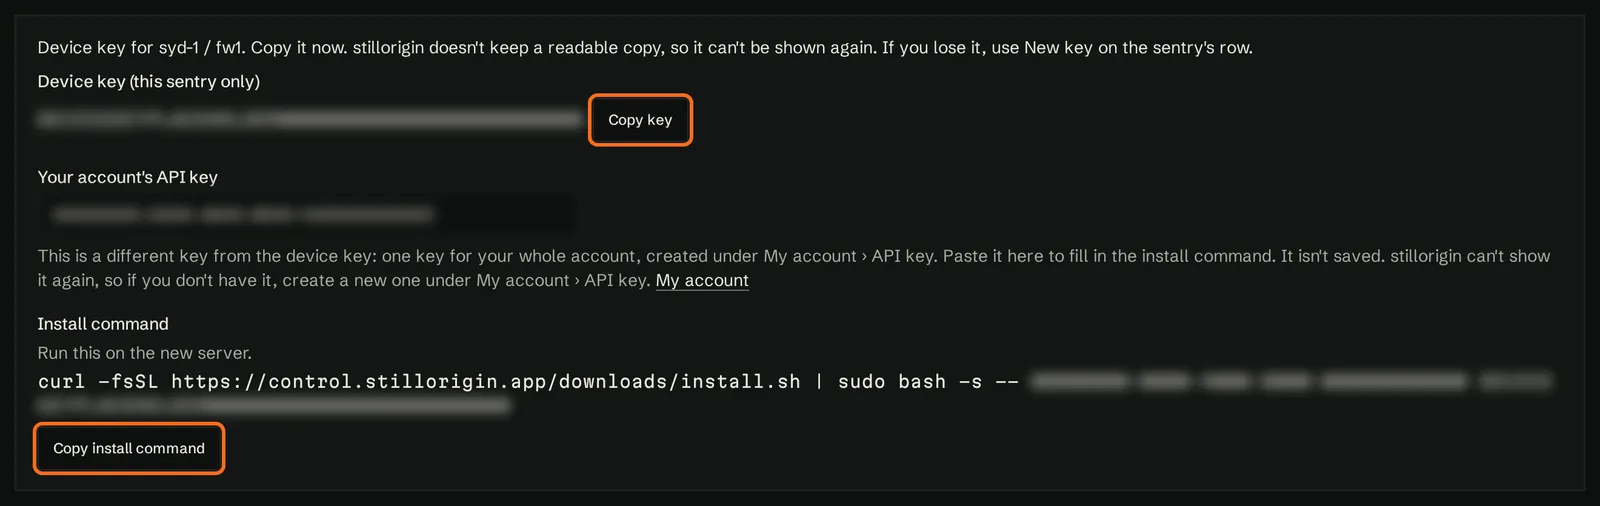
- Click Copy key and save the device key in your password manager, next to your API key.
- Check Your account's API key. If you created the key a moment ago in the same browser tab, it's already filled in. If not, paste it there. It only fills in the command on this page; it isn't saved.
- Click Copy install command.
The install command looks like this:
curl -fsSL https://control.stillorigin.app/downloads/install.sh | sudo bash -s -- YOUR_API_KEY <DEVICE_KEY>
If you didn't paste your API key on the page, replace YOUR_API_KEY with it before you run the command.
stillorigin doesn't keep a readable copy of either key. They stay on the page while you move around the portal in the same browser tab, but they're gone once you refresh, sign out, close the tab or open the portal in a new tab. If that happens before you install, click New key on the sentry's page to get a new install command.
Treat the finished command like a password: it contains your account's key and this sentry's key.
If you no longer have your API key, an account owner can create a new one under My account › API key. Your existing sentries then need the new key, and the old one can keep working for 7 days while you update them (see Your API key). You can also get a new device key from the cluster's Edit page, with New key on the sentry's row.
4. Run the installer
- Connect to the new server over SSH as root, or as a user that can use
sudo. - Paste the install command and press Enter.
- The installer prints a warning that the machine will become a firewall node and waits 15 seconds. Press Ctrl+C in that time if you want to cancel. Otherwise, let it run.
When it finishes it prints Install complete. The next lines tell you to check it connected: run journalctl -u stillorigin-sentry -n 20 and look for config applied. The sentry also shows as Online in the portal's cluster list and on the sentry's page.
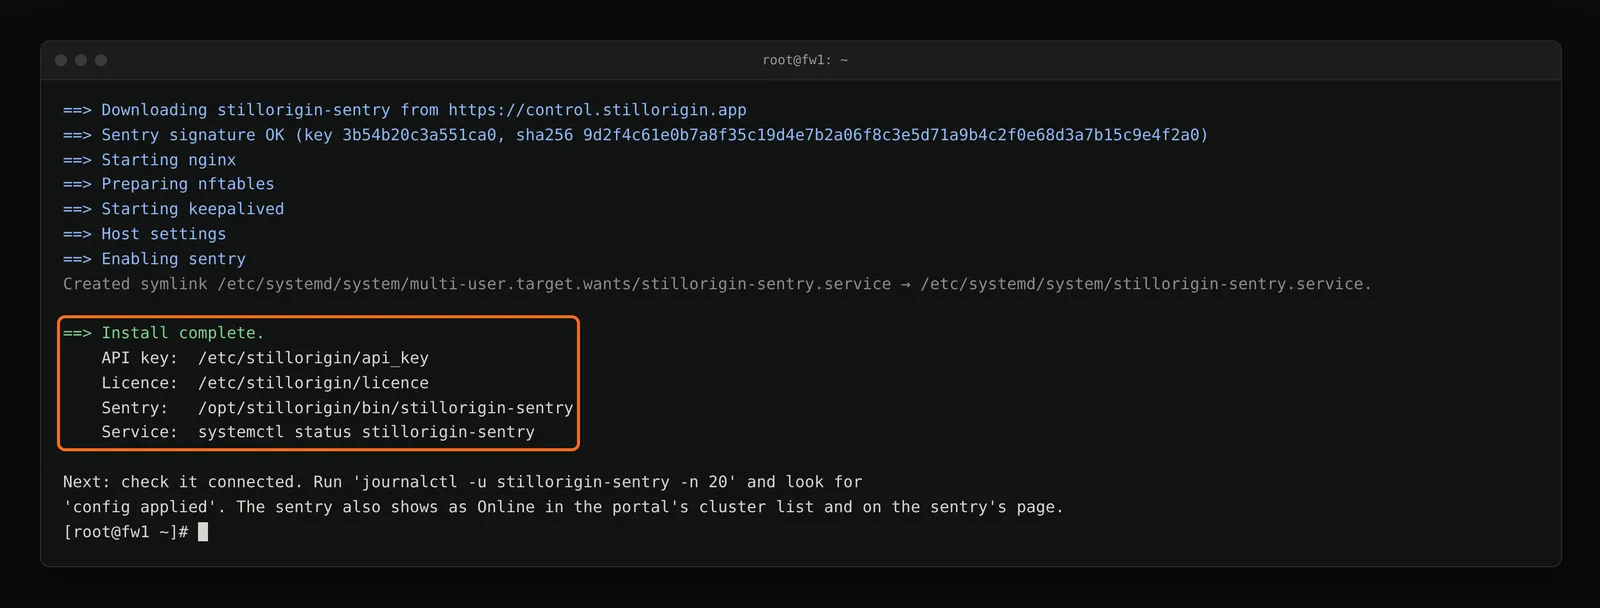
What the installer does
- Checks the operating system, that it is running as root, and that no hosting panel is installed.
- Installs packages:
epel-release,chrony,nftables,keepalived,conntrack-tools,iproute,curl,jq,tar,libmaxminddb,openssl,policycoreutils-python-utils,setools-console,socat, and nginx from the official nginx.org stable repository (over HTTPS). - Disables firewalld (if present) and enables nftables, chronyd, nginx and keepalived.
- Saves your account key and device key on the server, readable only by root.
- Downloads the stillorigin sentry and checks its digital signature before installing it. If the signature or checksum does not match, it stops without installing anything.
- Writes a minimal starting configuration for nginx, nftables and keepalived. The sentry replaces these with your real settings on its first check-in.
- On servers with SELinux enforcing, allows nginx to make outbound connections to your origins.
- Installs and starts the stillorigin-sentry service.
5. Check the sentry is online
Within about a minute, the sentry should check in. In the portal, open Clusters and click your cluster to expand it. On the sentry's row:
- Status shows Online (it has checked in within the last 10 minutes);
- Version shows the sentry version;
- Update shows up to date;
- Last seen shows a recent time.
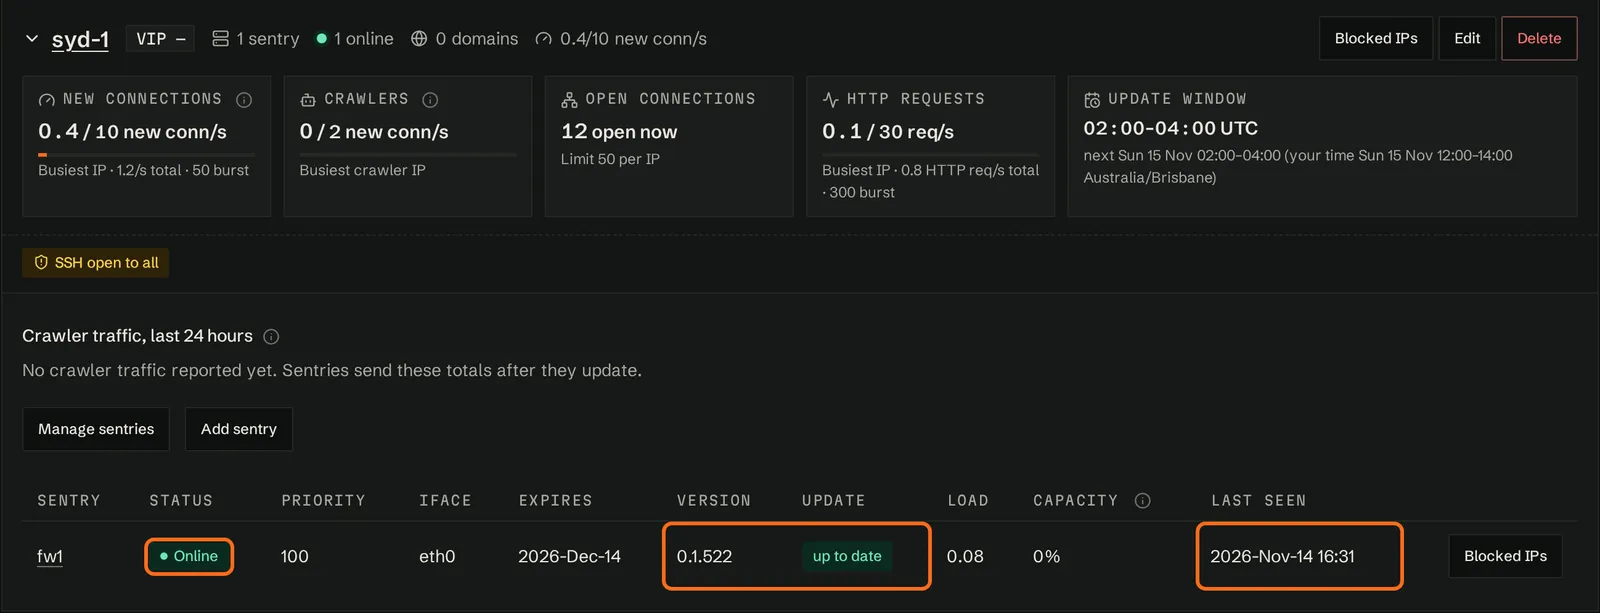
Click the sentry's name to open its page. Public IP shows the address the sentry reported, with a Copy button. Save it in your note: you'll use it for testing and DNS. If it says Not reported yet, wait a minute and refresh.

On the Getting started card, Install your first sentry is now ticked.
You can also check on the server:
# The service is running
systemctl status stillorigin-sentry

# Recent sentry messages; look for "config applied"
journalctl -u stillorigin-sentry -n 50 --no-pager

# Installed version
/opt/stillorigin/bin/stillorigin-sentry --version

# nginx configuration is valid and running
nginx -t && systemctl is-active nginx

# The stillorigin firewall rules are loaded
nft list table inet stillorigin | head

# The sentry's public IPv4 address (the one you will use in DNS)
ip -br addr
To see the sentry's load and traffic, click Edit or Manage sentries on the cluster, then Health on the sentry's row.
On the cluster's Edit page, add the addresses you manage the sentries from to the SSH allow-list. Add my IP adds the address you're browsing from. Click Save. Check your address is on the list before you save, so you don't lock yourself out. See SSH allow-list.
Add more sentries (optional)
To share the load and keep your sites up if one sentry fails, repeat steps 3 to 5 for each extra sentry in the same cluster. Every sentry in a cluster gets the same settings, domains and deny list automatically, and every sentry handles traffic at the same time.
The trial includes 1 sentry. To add more, end the trial and start a paid plan (see Ending your trial early).
If you only want one sentry, skip this. Your sites then depend on that one server.
Next: your origin and domains
With the sentry online, set up your web server and add your sites:
- Step 3: Configure your origin server: add the origin in the portal, install the origin agent, let your sentries through the origin's firewall, and make the origin see real visitor IP addresses.
- Step 4: Add your first domain.
Each domain starts with Website protection off (traffic is passed through by hostname, with the Network protection rules). See Network protection vs Website protection.
Point DNS at your sentries
Point DNS only after your origin and domain are set up and you've tested the site through the sentry. Step 5 walks you through it. In short:
- Lower the TTL of the records you're about to change (for example to 300 seconds) a day ahead.
- Replace each domain's A record with one A record per sentry, each pointing at that sentry's public IPv4 address.
- Remove any AAAA records that point straight at the origin, or point them at your sentries' IPv6 addresses instead.
- Check traffic arriving on Domains.
If a sentry goes down: round-robin DNS does not check whether a sentry is healthy, so some visitors keep being sent to the failed sentry. Remove its A record until it is back. A low TTL (such as 300 seconds) makes this take effect quickly.
Updates
Sentries update themselves. Each sentry checks for a new version every few hours and installs it during its cluster's update window (02:00 to 04:00 UTC unless you change it on Clusters → Edit). Before installing, the sentry verifies that the new version is digitally signed by stillorigin; an update that fails the check is refused and the sentry keeps running its current version. It never installs an older version.
On Clusters, and on the cluster's Edit page, the Update column shows up to date, waiting to update or waiting for force update. To update straight away instead of waiting for the update window, click Force on the sentry's row on the cluster's Edit page, or Force update all at the top of Clusters. The sentry restarts its service after updating; nginx and the firewall rules keep running during the restart.
See Sentry updates.
Removing a sentry
There is no uninstall script. To take a sentry out of service:
- Remove the sentry's A records from DNS first, and wait for the old TTL to pass so visitors stop arriving.
- On the server:
systemctl disable --now stillorigin-sentry. Then rebuild or repurpose the server; the installer changed its nginx, nftables and firewalld setup. - In the portal, on Billing, under Licences, Unassign the sentry's licence to return it to your pool. A sentry without a licence can no longer fetch settings.
- A sentry that never checked in can be deleted from its row on the cluster's Edit page. Sentries that have checked in keep their history; open a ticket if you want one removed from the list.
Troubleshooting
| Symptom | Likely cause and fix |
|---|---|
ERROR: Must run as root. | Run the command with sudo or as root. |
Unsupported distro or Only AlmaLinux/Rocky/RHEL 9 or 10 supported | Use a supported operating system and version. |
this is not a clean server | The installer found a web server, a control panel, something on port 80 or 443, or an earlier stillorigin install (the list after the message says what). Reinstall the operating system, or use a new server, and run the install command again. |
dnf install failed | The server cannot reach its package mirrors or EPEL. Check outbound internet access and DNS, then run the installer again. |
signed release manifest missing, signature is invalid or does not match its signed manifest | The download was incomplete or altered on the way. Check for a proxy or filter on outbound HTTPS. The installer had already set up nginx by then, so reinstall the operating system before you run it again. If it keeps happening, open a ticket. |
| Sentry stays Offline in the portal | Check systemctl status stillorigin-sentry and journalctl -u stillorigin-sentry -n 50. The server must reach control.stillorigin.app on TCP 443. |
ERROR: replace YOUR_API_KEY in the install command with your account's API key. | Put your API key in the command in place of YOUR_API_KEY. If you don't have it, create a new one under My account › API key. |
ERROR: the control plane URL must use https:// | The installer only talks to the control plane over HTTPS. Use the install command exactly as the portal shows it. |
Log shows control plane rejected API key (401) | The API key or device key on the server is wrong or has been replaced. If you created a new API key, run the command the portal showed (or put the key in /etc/stillorigin/api_key, replacing the old one) and then systemctl restart stillorigin-sentry. If you issued a New key for the sentry, run the command shown with it, which writes /etc/stillorigin/licence. Don't run the installer again: it refuses to run on a server that is already a sentry. |
Log shows node licence expired or not licensed (403) | The sentry has no in-date licence. Assign or renew one on Billing, under Licences. |
Log shows node '…' not in cluster | The sentry's licence is expired or in its grace period, or the sentry was removed. Check Licences on Billing. |
| Online, but sites do not load through the sentry | Check that the domains are added on Domains, that DNS points at the sentry's public addresses (dig +short example.com, and dig +short AAAA example.com for IPv6), and that TCP 80/443 are open in your provider's firewall. |
| Some visitors cannot reach the site, others can | With several sentries in DNS, one of them may be down or blocked. Check each sentry's Status, and remove a failed sentry's A record until it is back. |
| Sites show the stillorigin offline page | The sentry cannot reach the origin, or it did not answer in time. Check the origin's IP and port on Origins and that the origin accepts connections from the sentry. |
| Update shows waiting to update for days | The sentry only updates inside its cluster's update window, and not at all when automatic updates are off for the cluster. Click Force on the cluster's Edit page to update now; check the window there and the server's clock. |
Getting help
Open a ticket from Tickets in the portal. Include the sentry name and the output of journalctl -u stillorigin-sentry -n 100 --no-pager. Do not paste the install command or the keys into a ticket.